Looking for the app? See the MacBook battery monitor.
Guide
How to Limit MacBook Charging to 80%
- Published
- Last edited
On supported Apple silicon Macs, macOS now includes a built-in Charge Limit from 80% to 100%. Start there. AlDente remains a relevant dedicated charge limiter. MacBookBatteryMonitor is the broader option when you want charge control and live power monitoring in the same menu-bar app.
Quick answer
If you have an Apple silicon MacBook on macOS Tahoe 26.4 or later, open System Settings, go to Battery, click the information button next to Charging, and choose 80%. This is the direct built-in answer for a hard 80% limit.
If the Charge Limit control is unavailable, keep Optimized Battery Charging enabled. For third-party control, AlDente is a dedicated charging app. MacBookBatteryMonitor covers 50% to 100% and adds Sailing Mode plus live system and per-app power monitoring.
Why 80% matters for your MacBook battery
Apple says its charging optimization features reduce the time a Mac spends fully charged to improve battery lifespan. More generally, reducing exposure to high state of charge can reduce one contributor to lithium-ion aging, but temperature, time, charging pattern, and workload also matter.
The goal is not to prove that 80% is a magic number. It is to reduce time near full charge when you do not need the extra unplugged energy.
There is a tradeoff worth naming. An 80% cap means you only ever have 80% to spend, so a long flight or a busy day away from a charger will leave you with less headroom. A desktop-replacement MacBook that rarely leaves the desk may suit the lower cap. A MacBook that travels daily may benefit more from the extra unplugged energy. Choose based on the next period away from power.
The native charge limit in macOS Tahoe 26.4
Apple added a hard Charge Limit in macOS Tahoe 26.4. Per Apple's battery charging support document, supported Macs get a Charge Limit control in System Settings that runs from 80% to 100%.
The Mac charges to within a few percent of your chosen limit, then stops. It resumes only if the battery drops more than 5% below the limit. That is a real, enforced cap, unlike the older Optimized Battery Charging behavior. It still lets the battery reach 100% occasionally to maintain accurate state-of-charge estimates.
The native slider starts at 80%, and it does not include Sailing Mode to draw a battery down when it is already above the chosen target. If 80% is the limit you want, that simplicity is a benefit. Install another tool only when you need more control.
Optimized Battery Charging, the older fallback
Macs running macOS Big Sur 11 or later have Optimized Battery Charging. It remains the built-in fallback when the fixed Charge Limit control is unavailable. It is predictive rather than a hard cap.
It uses on-device machine learning to learn your daily routine, then holds the charge around 80% with a "Charging On Hold" status until just before it predicts you will unplug. The idea is that the battery spends fewer hours at 100% overnight without you having to think about it. When your habits are predictable, it can reduce the time spent fully charged.
Apple may still complete the charge to 100% based on your expected routine, and it occasionally charges to 100% to maintain accurate state-of-charge estimates. Use it when automatic behavior is acceptable. Use a fixed limit when you need the same ceiling every day.
Third-party options: AlDente and MacBookBatteryMonitor
The built-in control is the simplest answer to an 80% limit, but it is not the only answer. AlDente and MacBookBatteryMonitor both provide third-party charge control. AlDente concentrates on charge management, while MacBookBatteryMonitor combines charge control with live power monitoring.
AlDente for dedicated charge management
AlDente is a dedicated MacBook charging app. Its Charge Limiter lets you choose a target that it holds while the Mac is plugged in. It remains a reasonable choice when charge management is the main job you want the app to perform.
MacBookBatteryMonitor for charging and live power use
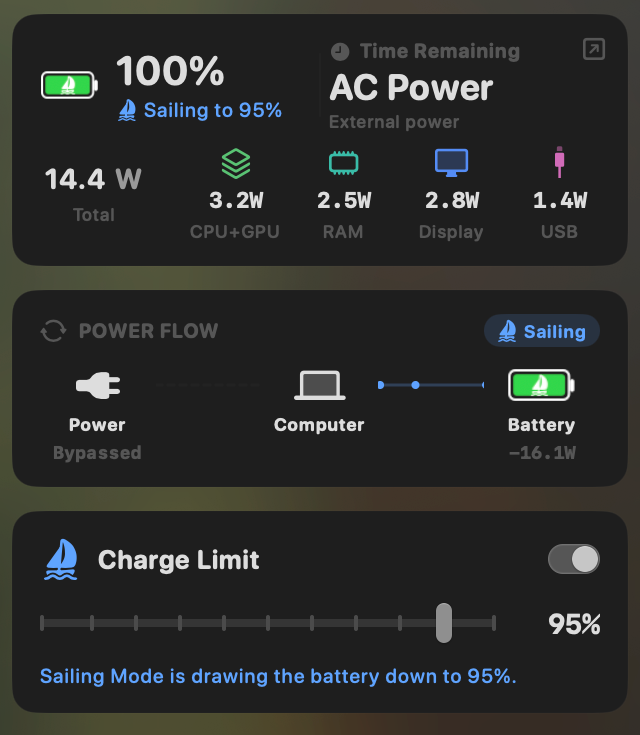
MacBookBatteryMonitor has a 50% to 100% charge-limit slider. You can keep the familiar 80% target or select 60% or 70% for a Mac that remains plugged in most of the time. The lower target also reduces the energy available when you unplug, so choose it for a real usage pattern rather than because a smaller number looks better.
Sailing Mode actively draws the battery down to the selected target while the Mac stays connected to power, then holds the limit. MacBookBatteryMonitor also shows whole-system and per-app watts, so the same menu-bar app handles both charging policy and the workloads consuming that energy.
The slider deliberately stops at 50%. This article does not treat very low charge targets as a battery-care advantage: they leave less reserve and make deeper discharge more likely when you unplug.
Which method should you use
Use the least complicated option that gives you the charging behavior and power information you need.
- Use Apple's Charge Limit for a fixed 80% cap. It is already installed and directly answers the search intent on supported Apple silicon Macs running macOS Tahoe 26.4 or later.
- Keep Optimized Battery Charging enabled when the fixed control is unavailable. It reduces time spent fully charged when macOS can predict your routine, but it is not a guaranteed ceiling.
- Use AlDente when you want a dedicated third-party charge limiter.It keeps the decision focused on charging and remains a relevant alternative to Apple's built-in control. If AlDente is not the right fit, compare the AlDente alternatives for Mac.
- Use MacBookBatteryMonitor when you want charge control and power monitoring together. It supports 50% to 100% targets and Sailing Mode, then adds live whole-system and per-app watts plus controls for high-use workloads.
Do not add a manual deep-discharge routine unless the tool you chose gives a documented reason and procedure. Apple's native feature occasionally charges to 100% on its own to maintain accurate state-of-charge estimates.
If the problem is charging speed rather than the target percentage, use the slow MacBook charging diagnosis instead.
FAQ
Does capping my MacBook at 80% mess up the battery gauge?
Apple says a Mac using Optimized Battery Charging or Charge Limit will occasionally charge to 100% to maintain accurate state-of-charge estimates. Let macOS handle that maintenance; Apple does not instruct you to run a manual 100%-to-20% cycle every few weeks.
Which Macs support the native charge limit in macOS Tahoe?
Charge Limit requires a Mac with Apple silicon and macOS Tahoe 26.4 or later. Open System Settings, click Battery, click the information button next to Charging, then choose a limit between 80% and 100%.
Should I set my MacBook charge limit below 80%?
A lower number is not automatically better. It leaves less energy available when you unplug and can lead to deeper discharge during normal use. If your goal is simply to avoid sitting at 100%, start with 80%. MacBookBatteryMonitor supports deliberate targets from 50% to 100% but does not present targets below 50% as a battery-care advantage.
Is AlDente still worth using now that macOS has a built-in limit?
AlDente remains a relevant dedicated charge-limiting app. If all you need is an 80% limit on a supported Mac, Apple's built-in control may already solve the problem. Choose AlDente when you want a third-party app focused on charging, or MacBookBatteryMonitor when you want charge control together with live system and per-app power monitoring.
Can I set a charge limit below 80%?
The native macOS Tahoe limit starts at 80%. MacBookBatteryMonitor supports adjustable targets from 50% to 100% on supported Apple silicon Macs. Choose a lower target only when the reduced unplugged runtime fits how you use the Mac.
Will limiting charge to 80% actually make my battery last longer?
Reducing the time a lithium-ion battery spends near full charge can reduce one source of chemical aging. The practical benefit depends on temperature, time at high charge, charging pattern, and use, so an 80% limit does not promise a fixed number of extra months.